WIRING DETAILS
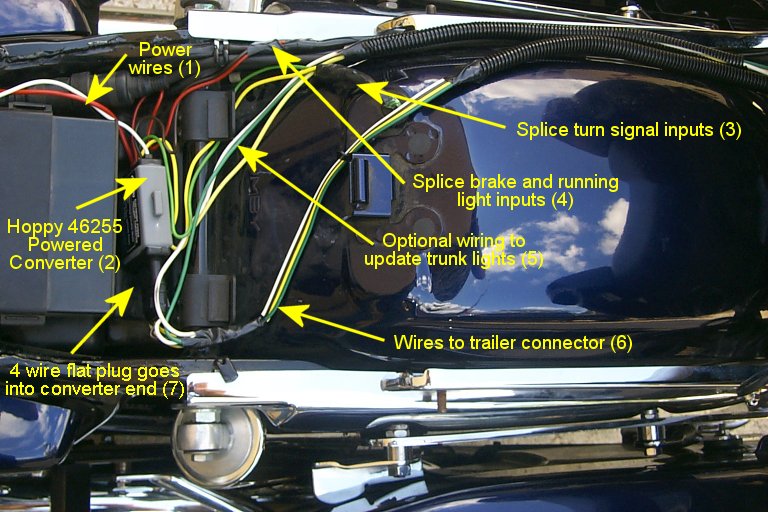
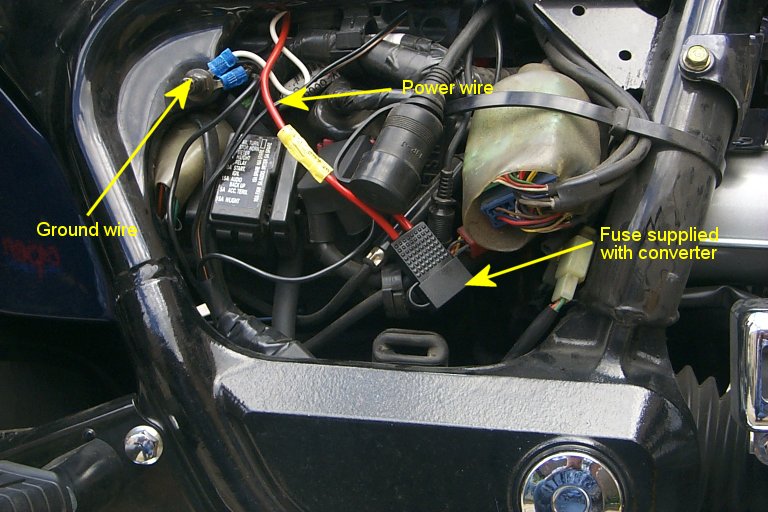
(1,2) I used a powered five wire to four wire converter (the Hoppy model 46255) in order to wire my Valk. The converter is needed because the Valk uses separate lights for brakes and turn signals, whereas the trailer uses the same filament for brakes and turn signals. I used a powered converter (unpowered ones also available) because the extra load for trailer lights looks like it might be too much for the puny wiring on the Valk. There are two added benefits: First, you isolate the Valk from any potential shorts, etc., and thus protect the bike; second, you can easily adapt the trunk lights to both act as brake lights and turn signals. See the next picture for how the power wire is connected under the right side cover.
PS: You can buy the Hoppy at Autozone or Walmart for about $30. You can also buy an equivalent at NAPA, except it is $59 there. Everything you need for install is included... power wires, trailer connection wire and plug... good kit.
(3) The turn signal lights are routed under the fender through a hole under the seat. I spliced in here because it is a lot easier than fooling with the jumble in the right side cover. Use a sharp knife to split open the black wire cover about three inches. Do not cut the wires... simply scrape cut the insulation from the wires for a length of 3/8" to 1/2". The orange wire is the left turn signal... connect the yellow wire from the converter input. The blue wire is the right turn signal... connect the green wire of the converter input. Solder is best... I guess you could use a crimp type connector. Wrap each wire individually with electrical tape, the rebind the black wire sheath with electrical tape.
(4) The brake lights and running lights run along the right side of the bike, inside the fender rail. Identify this wire bundle by tracing the wire bundle that runs into the trunk at the back bottom. Using a sharp knife to split open the black wire cover about three inches. Do not cut the wires... simply scrape cut the insulation from the wires for a length of 3/8" to 1/2". The brown/white wire is the running lights... connect the brown wire from the converter input. The green/red wire is the brake light... connect the small red wire from the converter input. Solder is best... I guess you could use a crimp type connector. Wrap each wire individually with electrical tape, the rebind the black wire sheath with electrical tape.
(5) Since this is a five wire to four wire converter, you can also make the brake lights on the trunk work as signal lights. You can get more exotic by changing the sockets and bulbs on the inside lights so that you can have two sets of brake/signal lights. I'm not getting into that here... you can jump to Chet's Page for that information. However, instead of using relays, etc. you splice into the OUTPUT of the converter... green is right, yellow is left, and white is ground. Again, do not cut the wires... simply scrape cut the insulation from the wires for a length of 3/8" to 1/2". The brown wire is running lights, the green wire is right turn signal, the yellow wire is right turn signal. Inside the trunk, cut the brake lights (green/red) and ground wire (green), and splice in the appropriate wires. Now, you will have four turn signals, the original orange stockers, and the modified brake lights. I covered the extra wiring with a black wire shield available at any auto parts store.
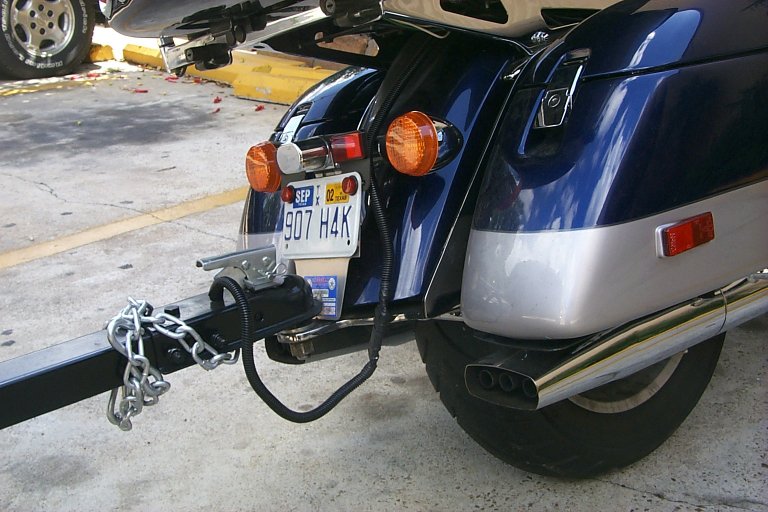
(6) This is the harness to the trailer. The last picture shows how it comes out. When not pulling the trailer, simply coil the trailer harness under the seat until next use. I covered the harness with a black wire shield available at any auto parts store.
(7) The harness that comes with the powered converter kit has a flat
4 wire connector on each end. Simply plug it into the end of the
converter. I spliced the wires that go to the trunk about 3 inches
up from the connector. This step is not necessary if you are not
planning on modifying your trunk lights.
POWER CONNECTION DETAILS
TRAILER WIRING CONNECTION
FINAL NOTE:
You can also wire into a Standard or Tourer pretty much the same
way. Just remember that ALL wires go through the hole in the fender.