Tongue Lenthening Details
I used a piece of 2 1/2" x 2 1/2" box tube of the same thickness as the trailer tongue. Since the trailer tongue is open on the bottom, I welded the extension on three sides, then welded a piece of flat iron on each side for increased strength. Total costs for material and welding - $40. Total time to remove tongue, reinstall, and lengthen wiring - 1.5 hours.
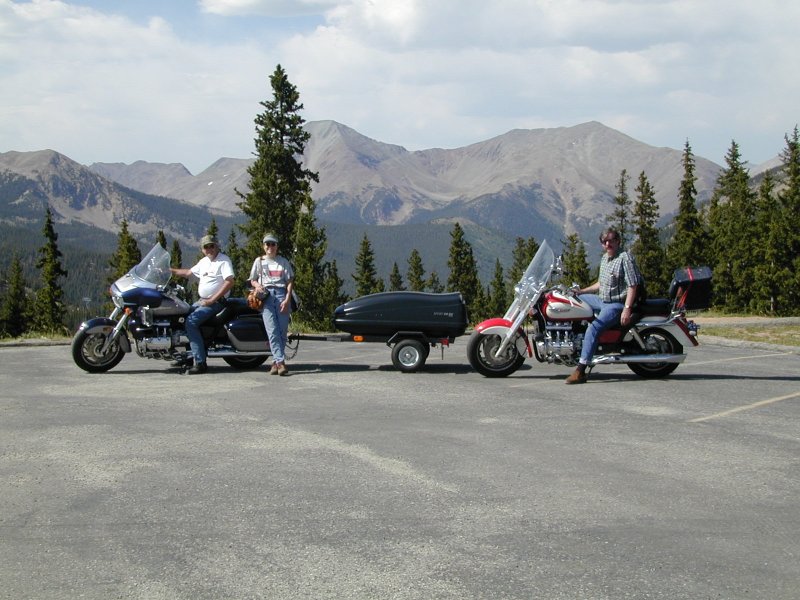
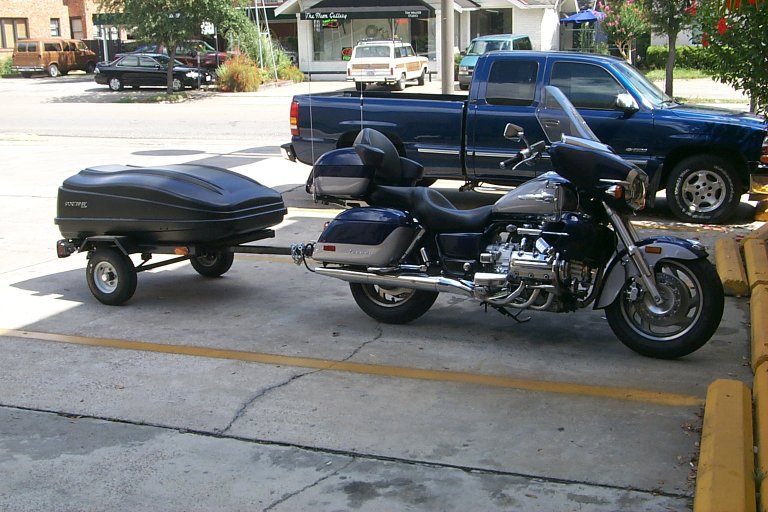
This mod makes quite a difference... the extra 20 inches completely removes trailer sway. I ran the trailer empty (about 5 lbs tongue weight) in excess of 95 mph with no sway. Also much less sway with gusting crosswinds... the tendency is to completely dampen any sway. I highly recommend this modification to the Harbor Freight trailer. The extra length makes no noticable difference in sharp turns... although I'm sure the trailer must track slightly closer to the curb. It also makes the trailer easier to back up and it means I can now attach an ice chest carrier.
Approximate Trailer Dimensions (with extended tongue) - stock Harbor Freight narrowed 4 inches
Width, between fenders: 36" (usable carry space)
Width, outside edge of fenders: 48"
Width, middle of wheel (between wheel bearings):
44"
Length, trailer bed: 48"
Length, overall, tongue to end of trailer: 99"
Length, tongue to axle: 78"
Length, tongue to back fastening crosss member: 73"
Total trailer length, including overhang of carrier:
104"
Height: about 33"
Building the Trailer
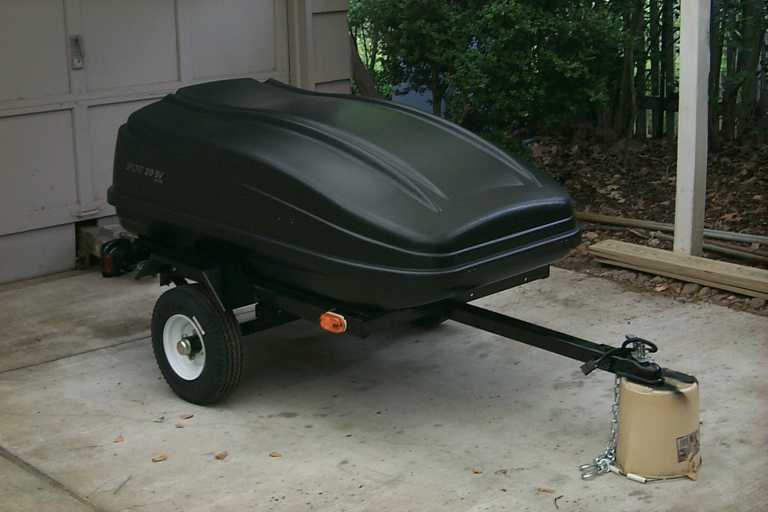
This trailer was built with the Harbor Freight mini utility trailer ($140) and the Sears hardshell cartop carrier (got it on sale for $160). I narrowed the trailer by four inches... a local welding shop cut and welded the axle, plus cut three cross members and drilled new holes for $30. You can cut as much as five inches from the trailer, but four allows you to use six existing holes. I used a half inch sheet of treated plywood mounted with 15 3/8" carriages bolts under the carrier... it adds a lot of stiffness to the trailer and keeps it square. The carrier itself is mounted to the wood with 10 5/16" carriage bolts.
See the additional detail about building the trailer at
the end of this page.
Write me at wayne@herberts.org
if you want more information.

Additional Notes on Building This Trailer
a) the Sears Carrier... This is the 20 cubic foot variety. However, they also sell an 18 cubic foot carrier... although it is gray on top it has the one advantage of side opening instead of the front open as mine is. Also, you pay less for it because it does not come with any mounting hardware... and I did not use any of the hardware that came with the 20 cubic ft model at all. I used the 20 cubic foot model to get an all black trailer. The hinges and cover raising mechanism seem very flexible (aka - flimsy) but seem to be strong enough under actual use. I think I will convert the carrier to a side opening type later this year. Also, in the rain, the trailer leaks slightly. However, I added sticky weatherstrip (the kind used to seal a camper shell on a pickup truck) and the leaks went away. This stuff also works to quiet rattles as the top comes in contact with the bottom.
b) Harbor Freight trailer... I bought the 8 inch wheel variety... it was $30 less than the 12 inch wheel variety... otherwise identical... if I had to do it over again, I'd opt for the 12"... everyone says big wheels ride a bit better... and from the dragbar angle you can see that the slightly larger wheels would make the trailer just a tad more level... although it isn't bad as is, and it pulls well.
c) If you measure carefully, you'll find you can narrow the trailer by 5 to 5 1/2 inches and still fit the carrier on it. I opted not to do this since if you look at the cross members on the trailer, cutting two inches off each side leaves half the bolt holes you'll need intact (only need to drill 6), and to me it just looked more sound. I had a welding shop do the cutting since they had a healthy saw.
d) In cutting the axle, some folks have inverted the left over U piece and welded it in for extra strength... I used a foot long section of 1/2" bar welded into the U... there is not a lot of lateral force anyway. I would recommend against grinding the welds since the material is fairly thin anyway... and a decent welder won't leave a huge bead.
e) Pull one of the leafs from the springs... the trailer is designed for 860 lbs max carry weight, 1000 lbs gross weight. This is easy to do... undo the small bolt holding the leaves together, use a cold chisel or old screwdriver to pry the leaf clamp open... discard short leaf and leaf clamp, then reassemble. Also, I run the tires at about 28 to 30 to minimize bounce... and this worked very well with about a 100 to 125 lb load... no noticeable bounce, even across rough railroad tracks... also, the allegations that this will cause premature tire wear seem to be just so much bushwa.
f) Some folks have welded the whole trailer together... I could see how this would help... but bolting in a sheet of plywood has made it very stable... there are mounting holes in the trailer frame... I used 15 3/8" carriage bolts to hold down the plywood, then used 10 5/16" carriage bolts to fasten the carrier to the plywood. It had zero problems, even over very rough terrain... ie, a gold camp road to an old mine.
g) Some folks have extended the tongue (I have done this... it definitely tows better... see top of page). The extension allows room for an ice chest up front... not enough room right now... would prevent a 90 degree bend... ice chest would interfere with my trunk. However, I have found the thing tows real well. Empty, there is a noticeable sway at about 70 upwards, particularly with a cross wind... but then again, tongue weight is about 5 pounds. Loading the front of the trailer makes it go away... i went up to 90 with about a 20 lb tongue weight and it was very steady. I've added to eye bolts inside the carrier up at the front so I can fasten a cargo net inside to keep the load forward. I don't want it slipping back.
h) Apparently, there are several swivel hitches available which will fit on this tongue. After much reading, I decided there were more cons than pros regarding swivels. The only real pro is that if you manage to flip your trailer... say over a curb, it won't want to dump the bike. Others have reported that the swivel makes the trailer more squirrely. Most trailer makers do not offer the swivel... and at a $100+, I passed.
i) Finally, the wiring... the trailer comes complete with lights and wiring, but the whole thing relies on the frame for ground. This worked fine for the side marker lights which use self tapping screws, but since I painted the trailer with black Rustoleum spray on before assembly, I could not get a good ground for the tail lights... so I ran an extra ground wire, then connected that wire and the one from the wiring harness plug to the frame just behind the hitch... you may be able to see the bolt under the safety chains in the 3rd pic on the trailer lights web page. (Once I assembled the trailer, I went back and spray painted all the bolts heads, etc.)
j) Approximate Trailer Dimensions
Width, between fenders: 36" (usable carry
space)
Width, outside edge of fenders: 48"
Width, middle of wheel: 44"
Length, trailer bed: 48"
Length, overall, tongue to end: 78"
Length, tongue to axle: 58"
Height: about 33"
k) The wires in the Valk for brakes and turn signals are not real heavy duty. Also, you must go from a five wire to four wire set up, so I used a powered controller from Hoppy... the Trailer Wiring web page shows the details of hookup. You can also see how I Attached My Hitch.
Have fun... it took me a full day to paint, put it together, etc.